Wheel Torque Requirements
| Wheel Size |
Torque Sequence |
| 1st Stage |
2nd Stage |
3rd Stage |
| 12" |
20-25 |
35-40 |
50-75 |
| 13" |
20-25 |
35-40 |
50-75 |
| 14" |
20-25 |
50-60 |
90-120 |
| 15" |
20-25 |
50-60 |
90-120 |
| 16" |
20-25 |
50-60 |
90-120 |
| 16.5" x 6.75" |
20-25 |
50-60 |
90-120 |
| 16.5" x 9.75" |
55-60 |
120-125 |
175-225 |
| 14.5" Demount. |
Tighten sequentially to 85-95 |
17.5" Hub Pilot
Clamp Ring & Cone Nuts |
50-60 |
100-120 |
190-210 |
17.5" Hub Pilot
⅝" Flange Nuts |
50-60 |
90-200 |
275-325 |
Trailer Maintenance Schedule
| Item |
Function Required |
Weekly |
3 Months or
3,000 Miles |
6 Months or
6,000 Miles |
12 Months or
12,000 Miles |
| Brakes |
Test that they are operational. |
At Every Use |
| Breakaway System |
Check battery charge and switch operation. |
At Every Use |
| Tire Inflation Pressure |
Inflate tires to mfg's. specifications. |
X |
|
|
|
| Brake Adjustment |
Adjust to proper operating clearance. |
|
X |
|
|
| Wheel Nuts and Bolts |
Tighten to specified torque values. |
|
X |
|
|
| Tire Condition |
Inspect for cuts, wear, bulging, etc. |
|
X |
|
|
| Brake Magnets |
Inspect for wear and current draw. |
|
|
X |
|
| Brake Controller |
Check for correct amperage & modulation. |
|
|
X |
|
| Suspension Parts |
Inspect for bending, loose fasteners, wear. |
|
|
X |
|
| Wheels |
Inspect for cracks, dents or distortion. |
|
|
X |
|
| Brake Linings |
Inspect for wear or contamination. |
|
|
|
X |
| Trailer Brake Wiring |
Inspect wiring for bare spots, fray, etc. |
|
|
|
X |
| Hub/Drum |
Inspect for abnormal wear or scoring. |
|
|
|
X |
| Wheel Bearings & Cups |
Inspect for corrosion or wear. Clean & repack. |
|
|
|
X |
| Seals |
Inspect for leakage. Replace if removed. |
|
|
|
X |
| Springs |
Inspect for wear, loss of arch. |
|
|
|
X |
| Hangers |
Inspect welds. |
|
|
|
X |
Brake Troubleshooting
Symptoms
| Causes |
Remedies |
| Open Circuits |
Find & Correct |
| Severe Underadjustment |
Adjust Brakes |
| Faulty Controller |
Test & Correct |
| Short Circuits |
Find & Correct |
| Causes |
Remedies |
| Grease or Oil on Magnets or Linings |
Clean or Replace |
| Corroded Connections |
Clean & Correct Cause of Corrosion |
| Worn Linings or Magnets |
Replace |
| Scored or Grooved Brake Drums |
Machine or Replace |
| Improper Synchronization |
Correct |
| Underadjustment |
Adjust Brakes |
| Glazed Linings |
Reburnish or Replace |
| Overloaded Trailer |
Correct |
| Causes |
Remedies |
| Underadjustment |
Adjust |
| Improper Synchronization |
Correct |
| Faulty Controller |
Test & Correct |
| Loose, Bent or Broken Brake Components |
Replace Components |
| Out-of-Round Brake Drums |
Machine or Replace |
| Insufficient Wheel Load |
Adjust System Resistor and Synchronize |
| Causes |
Remedies |
| Faulty Controller |
Test & Correct |
| Broken Wires |
Repair or Replace |
| Loose Connections |
Find & Repair |
| Faulty Ground |
Find & Repair |
| Causes |
Remedies |
| Wrong Magnet Lead Wire Color |
Correct |
| Incorrect Adjustment |
Adjust |
| Grease or Oil on Linings or Magnets |
Clean or Replace |
| Broken Wires |
Find & Repair |
| Bad Connections |
Find & Repair |
| Causes |
Remedies |
| Underadjustment |
Adjust |
| Improper Syncronization |
Correct |
| Improper Controller |
Change |
| Faulty Controller |
Test & Correct |
| Causes |
Remedies |
| Underadjustment |
Adjust |
| Lack of Lubrication |
Lubricate |
| Broken Brake Components |
Replace Component |
| Incorrect Brake Components |
Correct |
| Causes |
Remedies |
| Grease or Oil on Linings or Magnet |
Clean or Replace |
| Out-of-Round or Cracked Brake Drums |
Machine or Replace |
| Faulty Controller |
Test & Correct |
| Causes |
Remedies |
| Overadjustment |
Readjust |
| Out-of-Round or Cracked Brake Drums |
Machine or Replace |
| Incorrect Brake Components |
Replace |
| Loose, Bent or Broken Brake Components |
Replace |
| Faulty Breakaway Switch |
Repair or Replace |
| Loose Wheel Bearing Adjustment |
Adjust |
| Bent Spindle |
Replace Axle |
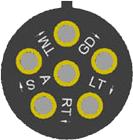
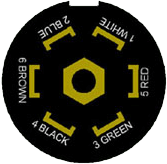
How To rewire a Trailer Plug
Our trailers are wired using the most common color coding for the trailer industry. The chart below gives the trailer wire color, its electrical function and where
to connect on the proper plug or connector. Before starting, verify all wiring with a test light.
IMPORTANT NOTE: The engraved lettering on the 7-Pole RV Connector are for wiring RVs NOT trailers. YOU MUST GO BY ELECTRICAL FUNCTION.
| Trailer Wire Color |
Electrical Function |
Flat 4-Way Plug |
6-Way Plug |
7-Pole RV Connector |
| White Wire |
Trailer Ground |
White Wire |
GD |
1 White |
| Brown Wire |
Tail & Marker Lights |
Brown Wire |
TM |
3 Green |
| Yellow Wire |
Left Turn |
Yellow Wire |
LT |
5 Red |
| Green Wire |
Right turn |
Green Wire |
Rt |
6 Brown |
| Blue Wire |
Electric Brakes |
|
S* |
2 Blue |
| Black Wire |
Accessory / Battery |
W |
A* |
4 Black |
| Red Wire |
Auxiliary |
|
|
7 Yellow |
| * Some manufactures use A for brakes and S for Accessory/Battery. |
Tire Wear Diagnostic Chart
| Wear Pattern |
Cause |
Action |
 |
Center Wear |
Over Inflation |
Adjust pressure to particular load per tire catalog |
 |
Edge Wear |
Under Inflation |
Adjust pressure to particular load per tire catalog |
 |
Side Wear |
Loss of camber or overloading |
Make sure load doesn't exceed axle rating. Align at alignment shop. |
 |
Toe Wear |
Incorrect toe-in |
Align at alignment shop. |
 |
Cupping |
Out-of-balance |
Check bearing adjustment and balance tires. |
 |
Flat Spots |
Wheel lockup & tire skidding |
Avoid sudden stops when possible and adjust brakes. |
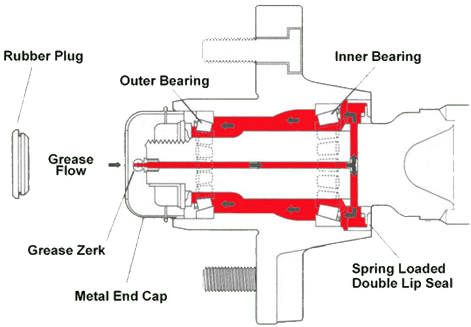
PowerLube Axle™
The PowerLube Axle™ is a hole drilled through the center of the axle that meets a cross drilled hole located between the rear bearing and the back seal.
The end of the hole is then threaded for a grease zerk. This allows for a fast and easy wheel bearing grease repack. Below are instructions and a diagram.
First, romove the rubber plug. Second, fully insert a standard grease gun onto the grease fitting. Third, pump grease into fitting while rotating the hub or drum.
The old grease will begin to flow back out of the cap around the grease gun nozzle. Finally, when new clean grease appears, remove the gun, wipe off all old and
excess grease and replace the rubber plug.